


Promoting your business is very important thing.
The banners are yet another important marketing tool these days. The pull up banners are used to attract the customer and inform them about the launch of new product,sale, promotion, opening of new outlet or any other eye catching news. The pull up banners is widely used by people these days for the promotion of their products. These banners are placed at different locations. You can easily get a nice pull up banners made from a professional. The banners should be simple without any extra or useless
Take your show on the road! Or display your message close to home! Either way, a retractable banner is an essential tool for getting your message noticed. These 5 things make retractable banners - or pull up banners - a great marketing aid. for five reasons!
1- Easy to set up
2- Easy to transport
3- Can be combined or used on their own
4- They're changeable
13oz Vinyl
13oz Vinyl Banners are a economical, flexible and a portable way to help your clients get their message in front of their clients. They are weather and tear resistant making them great for indoor or outdoor use and they can be displayed horizontally or vertically to maximum your viewing area. They are most often used as temporary signs, grand openings, POP displays, sponsor recognition, advertising specials, media walls and trade show booths. The sides and tops are often folded over and hemmed (stitched or taped) and can also come with grommets for easy hanging.
Preparing Files for Print
General Artwork Preparation Guidelines
- Download our template/guide to ensure proper placement of images and text.
- Each order submitted including multiple paged projects MUST be submitted as a single PDF file. Please ensure that all pages have the proper orientation to ensure proper back up. They must also have bleed and make sure each page are all the same size.
- It is always a best practice to try to avoid using borders in your design. If a border is too close to the trim, the trim may be slightly off-center. Even a hairline difference can cause your design to look off centered.
- File must consist of a 1/16" bleed (books and magazines will require an 1/8”). All of the relevent graphics and text must be within the safety margin unless you intend to have part of it cut off(this is sometimes the desired effect, so please make sure it is done the way you would like it printed)
- Ensure that your PDF process colour (CMYK) and saved in high resolution. As a rule it is suggested all files should be saved at 300 DPI. Spot Colours and coating will need to be set up as such within the chosen layers. Additional charges will apply if applicable.
- We recommend that all black type should have the following values: C0, M0, Y0, K100.
- Make sure all of your fonts are properly embed or outline when saving your file as a PDF.
- In order to achieve the best colour results, it is important for you to supply your artwork as CMYK files. If your artwork is submitted as RGB, it will be converted to CMYK and may not match the colours you are expecting. Please note that all offset printed work is printed in CMYK or PMS and can not be produced in RGB unless converted. This is an automated process for us and we suggest if you are designing your files, you should also consider designing in CMYK mode instead of RGB.
Large Format Guidelines
- Although bleed is not required for large format projects, often it is preferred. When saving your artwork if you wish to have bleed, please add 1/8” to your canvas size.
- Please compress your file using a ZIP file compressor to reduce the file size and speed up the uploading process when submitting your orders.
Coated 1 Side (C1S) Guidelines
- Please follow the general artwork guidelines and…
- Be sure that the first page of your PDF file is the side that you want to be on the coated side of the card. Please keep in mind that the second page of your PDF will always be printed on the uncoated side.
Envelopes Guidelines
- Please use crop marks to help us align your logo placement. In the absence of crop marks, printing will be 3/8” from the top based on general industry standards for envelopes.
- All text must be within the safe margin. Envelope artwork cannot have bleed unless they have been custom quoted by our estimating department and if this is the case, the must be submitted as a custom upload order.
- Please make sure that you do not have creative or text 1/8” from any of the edges.
Numbered Tickets Guidelines
In order to make sure your ticket order is numbered correctly, ensure that you include the following files:
- Your PDF file of your artwork (with no numbering in the artwork)
- Also include an excel or csv file containing list of numbers you will need printed on your tickets.
- Please make a mock up version of your artwork showing where and how you need the numbers placed. Please make sure this file is clearly labeled as a mocked up sample.
Variable Printing Guidelines
In order to make sure your variable printing order is produced correctly, please ensure that you include the following files:
- Your PDF file of your artwork (without any variable text in it).
- Also include an excel or csv file containing list of variable data you need printed on your order.
- Please make a mock up version of your artwork showing where and how you need the variable data placed. Please make sure this file is clearly labeled as a mocked up sample.
Saving as PDF Format
Please save your file as an Adobe PDF.
PDF is a universal format that ensures your documents look the same on every computer.

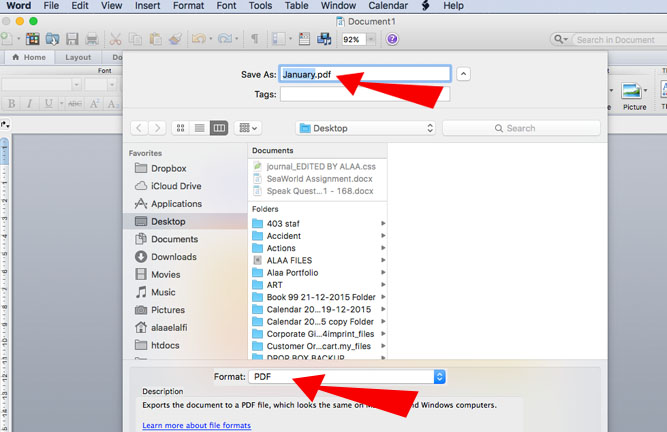
Saving a file as a PDF is typically done through either the "Save As" command (Adobe Illustrator, Adobe Photoshop, Microsoft Word) or the "Export" command (Adobe InDesign). Some programs, such as Corell Draw, may have a special "Publish to PDF" (or similar) option.
Embedding and Outlining Fonts
In the vast majority of cases, simply saving your file as a PDF will embed any fonts you have used. However, in some cases, such as when you are using a file format other than PDF, outlining the fonts may be required.

In Adobe Illustrator, you can find the "Create Outlines" option under the "Type" menu. Most programs will have similar options. Please note that converting your type to outlines means that you will no longer be able to edit it.
Adding Bleeds, Crop Marks and Press Quality
Most machines are unable to print to the edge, as it leaves them nowhere to hold the paper. Because of this, you need to add bleed and crop marks to your image. "Bleed" is image that extends beyond the edge of your finished product. "Crop marks" are lines within the bleed that tell us where to cut.
Adding bleed and crop marks is simple! First, make sure that your artwork extends beyond the borders of your document.
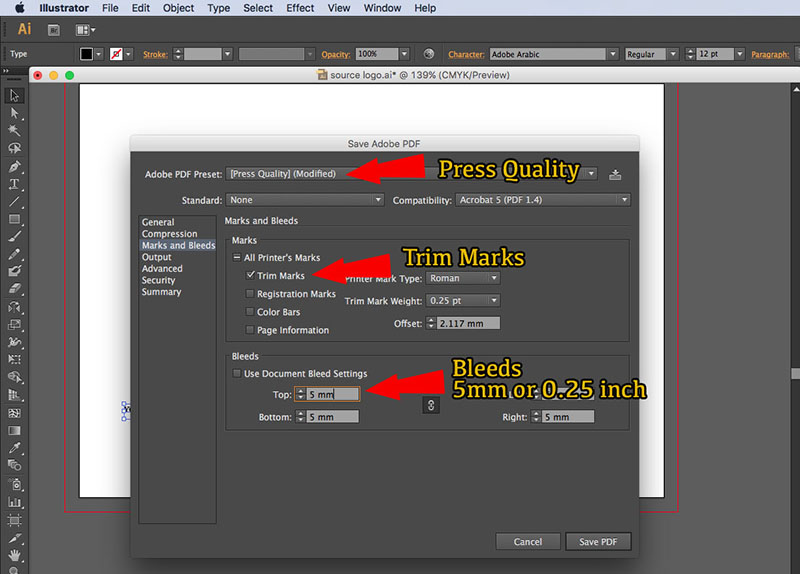
Now, when you save your document as a PDF, select the "Marks and Bleeds" section. Check the "Trim Marks" box. If your document does not already have bleeds, uncheck the "Use Document Bleed Settings" box and enter a value of 0.25. Save the PDF, and it will now include crops and bleeds.